Critical praise for Christy!

For "Murder Hooks a Mermaid:"
"Author Christy Fifield creates the kind of characters that stay with you for a long time. Fifield’s new Haunted Souvenir Shop mystery, Murder Hooks a Mermaid has it all: a sunny, relaxed setting, captivating locals, delicious food, and—of course—murder! Delightful amateur sleuth Glory Martine is back with her wisecracking parrot and charming group of friends in this thoroughly entertaining adventure. Don’t miss it."—Julie Hyzy, National Bestselling author of the Manor House Mysteries and the White House Chef Mystery series
"A whodunit with a dose of the supernatural, "Murder Hooks a Mermaid" is a worthy successor to the series opener and showcases Fifield's talents for plotting, characterization and humor." - Richmond Times-Dispatch
"Quirky and unique, a heroine for whom you can't help but root. The story sucks you in." - The Maine Suspect
"With a lovable cast of characters, good conversations and a great setting, this well-written book is a terrific read." -- Dru's Book Musings

For "Murder Buys a T-Shirt:"
A refreshing new sleuth! - Lynne Maxwell, Mystery Scene Magazine
"A fun book that will make the dreariest of days a little brighter! Socrates' great Book Alert" - Socrates' Cozy Cafe
"An entertaining and clever Florida whodunit" - Harriet Klausner
"Hilarious! A great murder mystery with well-written characters" - Paranormal & Romantic Suspense Reviews
For the Georgiana Neverall Series:
"Christy Evans will find legions of fans with this new series" - Sheldon McArthur, Lincoln City News Guard
"Funny and entertaining -- a solid mystery filled with likable characters." - RT Book Reviews"
Cute cozy mystery debute -- wry humor -- adorable dogs" -Publisher's Weekly
"Will have you giggling out loud! Four Stars." - Kathy Fisher, The Romance Readers Connection"The Book is good! Keep them coming, Ms. Evans!" - Mystery Scene
"Evans delivers a fast-paced mystery with admirable finesse!" - Sharon Galligar Chance, FreshFiction.com
"Christy Evans has a hit on her hands" - Harriet Klausner, Bookreview.com
"Christy Evans is aces. I'll be very suprised if Sink Trap isn't an instant hit with cozy readers!" - CozyLibrary.com

Sunday, April 17, 2011

Cooking Up a New Series - Part Seven - Sweet Potato Casserole

You can tell it's Southern cooking by the parrot!
All of my Southern cooking is an experiment, and some of the results are better than others.  For instance, the problem with the hush puppies (see Part Two).  I had to thicken the batter, and I didn't make notes of my changes so I haven't been able to post a recipe yet.  On the other hand, the fried cornbread came out well and I was pleased with the results (in Part Six).

My first attempt at sweet potato casserole falls in the "less successful" category.  It was tasty, but it wasn't what my expert taste-tester expected and it needs some work.

But I'm not proud - I'm happy to share the tasty failures, too!

Mis en place for sweet potato casserole
The bowl at left is cornmeal for fried cornbread
There are a few tricks I've stolen from cooking shows over the years, and one is the concept of mis en place.  It's a French phrase that means (more or less) "everything in place."

You know how it is when you watch one of those shows, and they have little dishes of every ingredient already measured and ready in a tiny glass bowl?  They never waste camera time measuring, and it's also a great way to determine that you have every ingredient.

In fact as I was setting up for this recipe I discovered that I didn't have miniature marshmallows.  Fortunately the grocery store is only three blocks away.  On a cooking show there would be an able assistant, ready to run do the chef's bidding at any moment.  For me that was the amazing husband/photographer/Official Taster, who ran to the store for marshmallows as I started cooking.


Because the Official Taster prefers yams, that is what I actually used.  Most any variety of sweet potato or yam will work, but that may be part of what went wrong with mine.  I will need to experiment with either different tubers.  But once they were peeled and chopped I put them on to boil until tender.

While the yams simmered, I took a few minutes to clean up the kitchen.  I have discovered that this kind of cooking -  with new recipes and sometimes unfamiliar ingredients - can create a lot of havoc in my kitchen, and lead to many piles of dirty dishes.  Since I have an older house, built at the end of WWII, it doesn't have a dishwasher.  Someday, I have promised myself, we will remodel the kitchen.  Someday!

Bubble, bubble
Sweet potato trouble!

After a few minutes at a slow boil, the yams were fork-tender and ready to mash.  The recipe called for three cups of mashed sweet potato, which seemed like a lot for two people, so I used two small yams and cut the rest of the ingredients in half.  It was plenty, and we even had leftovers.

Once the yams were tender, I drained them in a colander and returned them to the pan to mash them.  I have an ancient hand masher, which was all I needed to smash the yams without completely destroying the texture.
An old-fashioned hand masher works just fine!

However, I think I may have over cooked the yams.  The consistency, as you will soon see, was thinner than I would have liked.  The Official Taster also said it should have been more like dense mashed potatoes than the dish I produced.  Thus the label of Tasty Failure.

But I digress...

Sugar
 The yams were mashed, ready to be mixed, and here is where the mis en place shines!

Once the yams were mashed, I added the remaining ingredients,


Sugar ...

Butter


Butter ...


Milk ...


Eggs and vanilla,
and poured the resulting mash into a baking pan.
Tasty, but way too soupy!

This is when we realized the mixture wasn't as thick as we thought it should be.  There wasn't a lot I could do at this point, so I forged ahead with the topping


A chef's trick, right in my own kitchen
A second mis en place was ready with flour, brown sugar, melted butter, and chopped nuts.  In a concession to the Official Taster I omitted coconut.  Not pictured are the miniature marshmallows my dedicated assistant fetched from the store while the yams were simmering and I was cleaning up the mess from peeling and chopping.


I mixed the nuts, brown sugar and flour into the melted butter, and then added the miniature marshmallows.

I spread the topping over the mashed yams in the baking dish, and it was ready for the oven.


After baking, the casserole was a beautiful, bubbly brown on top, with puffs of golden melted marshmallows. It smelled great, and tasted fine, but it wasn't exactly ready for its close-up.  Here's hoping I can do a better job next time, and show you a finished product that will make your mouth water!


But for the record, here is a plate of the finished casserole.  Too soft to hold its shape, it probably belongs in a small bowl rather than on a plate - it was more like a pudding than a casserole, and it's quite sweet, too.

Stay tuned for more Southern cooking adventures soon!!  Maybe I'll get the pictures for that banana pudding ...


Sweet Potato Casserole


3 cups boiled and  mashed sweet potatoes
1 cup sugar
1/2 cup milk
1/3 cup butter
1 tsp vanilla
2 eggs, lightly beaten

Add sugar, milk, butter, eggs, and vanilla to mashed sweet potatoes.  Place in an oven-proof casserole and top with a mixture of

1/3 cup melted butter
1/3 cup all-purpose flour
1 cup brown sugar
1 cup chopped nuts, pecans preferred, but walnuts also work
1 cup coconut (optional, according to the Official Taster)
1 cup miniature marshmallows

Bake at 350 degrees until brown and bubbly, about 30 minutes

Tuesday, April 12, 2011

Cooking Up a New Series - Part Six - Fried Cornbread


After my first Southern meal of catfish and hush puppies (detailed in parts OneTwo, and Three), my next experiment was black-eyed peas with ham shanks (detailed in part Five) and fried cornbread.

This time I didn't need to use the deep fryer, just a frying pan and a much smaller amount of oil.  Since I had carefully strained and stored the shortening from the catfish and hush puppies I was able to re-use some of that shortening to fry the cornbread.

Using that oil also allowed me to test my theory about using oil that had been used for fish. It did, indeed, impart some great flavor.

Making fried cornbread, I discovered, is really a simple process.

First you assemble the dry ingredients, then add boiling water, stir, shape and fry.  It really is that easy!


While the process in quite simple, it also takes some patience, a word that keeps coming up again and again as I go through these recipes.  Giving the dry ingredients a few minutes to absorb the boiling water and to cool seems to develop a more easily-handled dough.

As the dough became pliable and cooled, I took a ball about the size of a golf ball, shaped it with my hands, and flattened it with my fingertips.  The result was a bunch of patties about the size of the palm of my hand, and a half-inch thick.  In order to avoid letting the oil sit on the heat, I shaped all the cornbread first - before I started frying.

I heated the oil in the pan, letting it come up to temperature before I started cooking.  I put a few pieces at a time into the oil.  As they turned golden on the bottom and started to brown around the edges, I flipped them to fry the other side.

In a couple minutes they were cooked through and a beautiful golden brown.

And here's the finished plate of fried cornbread, ready to sop up the juices off the black-eyed peas!


Fried Cornbread

1 1/2 cup self-rising cornmeal
1/2 teaspoon salt
2 cups boiling water

Mix cornmeal and salt in a large bowl.  Stir well and pour boiling water over dry ingredients.  Stir to mix well. Dough will be slightly runny, but will thicken as it cools.  When dough is cool enough to handle, shape into balls about the size of a golf ball.  Wetting your hands will help to prevent sticking as you shape.  Flatten the balls with your fingers to about 1/2 inch.

Place the shaped pieces on plastic wrap or waxed paper until all pieces are shaped.

Heat about a half-inch of oil or shortening in a large frying pan.  When the oil is hot, place a few pieces of cornbread in the hot oil.  Cook until the bottom is golden and the edges begin to brown.  Turn and continue frying until the second side is also golden.

Drain on paper towels, and serve with your favorite Southern main dish!

Up next - Part Seven - Tasty Sweet Potato Failure


Thursday, April 7, 2011

A New Logo!

Since I have been doing the Southern cooking blog posts, we thought it might be cool to add a logo to the posts that will quickly identify them as a part of the MURDER IN A SHOT GLASS series.  And now we have a shiny new logo to add to the posts!

Here it is, in all its glory.


Look for the SHOT GLASS logo on the Southern cooking blog series, and on other posts about the Haunted Gift Shop series.  Sort of like the faucet logo for the Lady Plumber series.  And I'll be putting it on guest blog posts, so you can revel in your special secret knowledge of what it means.

I'll be looking forward to putting up more cooking posts.  These are experiments and they don't always work, but I will share the good, the bad, and the ugly for your entertainment and edification.

Coming soon (as soon as I get pictures) is a banana pudding discussion.  And then there are black-eyed peas with a ham shank, fried cornbread, and a yummy failure of a sweet potato casserole.

Stay tuned for some tasty adventures!

Wednesday, April 6, 2011

Cooking Up a New Series - Part Five - Black-Eyed Peas

I know, I know.  I skipped Part Four.  Actually Part Four is written, but I don't have pictures yet, so it will have to wait for another photo op.  See, I made the pudding before I realized I wanted pictures for the blog, so (boo hoo!) I'll have to make another pudding and take lots of pictures.

In the meantime, we've added a logo for the Haunted Gift Shop mystery series.  Since Bluebeard the foul-mouthed parrot is a major character in the new series we've put his picture on a shot glass, to celebrate the first title in the series: MURDER IN A SHOT GLASS

Now, on to our next cooking experiment!

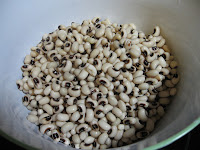
Because we live in the Northwest, and don't have access to fresh peas, I bought a bag of dried peas at the local market.  To prepare beans for cooking, I rinsed the peas and picked out a couple that looked  questionable.  Then I soaked the pound of dried peas in a bowl of water overnight.

There are shortcut methods of soaking, but I always feel like overnight is better.  I also changed the water in the morning, and left them to soak for a few more hours, until it was time to start cooking.

While I didn't have access to ham hocks, I did find ham shanks at the local market.  I could have just started the beans cooking with the ham shank, but I decided browning the ham shank would give me better flavor. 

 
  I started with a little olive oil so the ham wouldn't stick, though it quickly gave up lovely juices and started to brown nicely.  Once I had a little golden brown on the ham, and deglazed the pan with a little water, I added the initial seasoning - finely chopped onion (in deference to Mr. Christy) and several cloves of fresh garlic.

I sauteed the onions and garlic for a few minutes in the ham juices and olive oil, until they also got to be lovely golden brown.  By this time the house was starting to smell pretty good - a combination of aromatic vegetables and browning pork.

Now I was ready to add the beans.  I drained the water in which they had been soaking, and double-checked for any flawed beans.  After all, I wouldn't want to show you beans that were less than perfect!

I added water to the pan with the the ham shank and vegetables, then poured in the soaked and drained beans.

Once the ham and beans were in the pot, I added seasoning - celery seed, dried parsley (I would have used fresh if I had it - stay tuned for a discussion about herb gardens one of these days), black pepper, and salt.

Now it was time once again for patience.  The beans needed to simmer for a couple hours, until they were tender and ready to eat.  Along the way I tasted and adjusted seasoning as I went.  The ham shank was pre-cooked, but as the broth developed, minglling the ham juices with the vegetables and seasonings, the ham got even more tender.  As you can see in the second cooking picture the ham was practically falling off the bone.


When it reached that stage I took it out of the pot - carefully, because it was HOT - and removed the meat from the bone.  Aside from the heat it was an easy process since the ham was very, very tender.

I cut the ham into small pieces and added it back to the pot. 


At this point the peas were ready to serve, but Mr. Christy thought they were not as thick as he wanted.  After some consideration I added a little flour to thicken the broth.  The other choice, which I will try the next time, will be to start with less water, so the finished dish will be more like beans and less like soup.

But either way, it was mighty tasty!

And here you have the finished product, ready to go on a plate with fried cornbread - that's the next post! - and serve to your nearest and dearest!


Black-Eyed Peas and Ham Shank

1 cooked ham shank, about 1 pound
1 T. olive oil
1 pound dried black-eyed peas
8 cups water for soaking
3/4 cup chopped onion
4 cloves garlic
8 cups water for cooking
1/2 tsp celery seed
2 tsp dried parsley
1/2 tsp black pepper, or to taste
2 tsp salt, or to taste

Rinse beans and pick out any broken beans or stones.  Soak in water in large bowl over night, at least 8 hours.  Drain and discard soaking water.

Brown ham shank in olive oil.  Add onion and garlic, saute until vegetables begin to brown.  Carefully add water.  Add beans to pot, along with the rest of the seasoning.  Simmer for 1 1/2 hours, taste and adjust seasoning as desired.  Take the ham shank out, remove the meant from the bone and cut into small pieces, then return to the pot.

Check beans for texture, and continue simmering, if necessary, until beans reach the desired level of doneness.

Serve with fried cornbread. (Stay tuned for our next post.)